sunset harvest

Saturday, October 29, 2011

Tricking Aunt Kathy

My mom felt like she struck gold when she bought about a dozen avocados at the grocery store for 99 cents each the other day. So when I arrived for a visit she had about 6 remaining on the counter. Aunt Kathy was visiting from Arizona and while we were eating dinner I noticed her refusal to even pass the bowl of avocado. Thinking nothing of it, till a few nights later when she came over for dinner and although she was highly suspicious, we got her to eat an avocado dip. I simply remember her insisting there was avocado in the dip, and my sister, Katy, reassuring her that there couldn't be because she herself, not a fan, was eating the dip and liked it. Now on the other extreme, my mom didn't think the dip had enough avocado flavor to it. I thought it was a perfect dip and it would sure please a lot of party guests.

Begin by slicing the avocado in half, cutting around the pit, poke your knife in the pit to remove it and begin to score each half of the avocado.
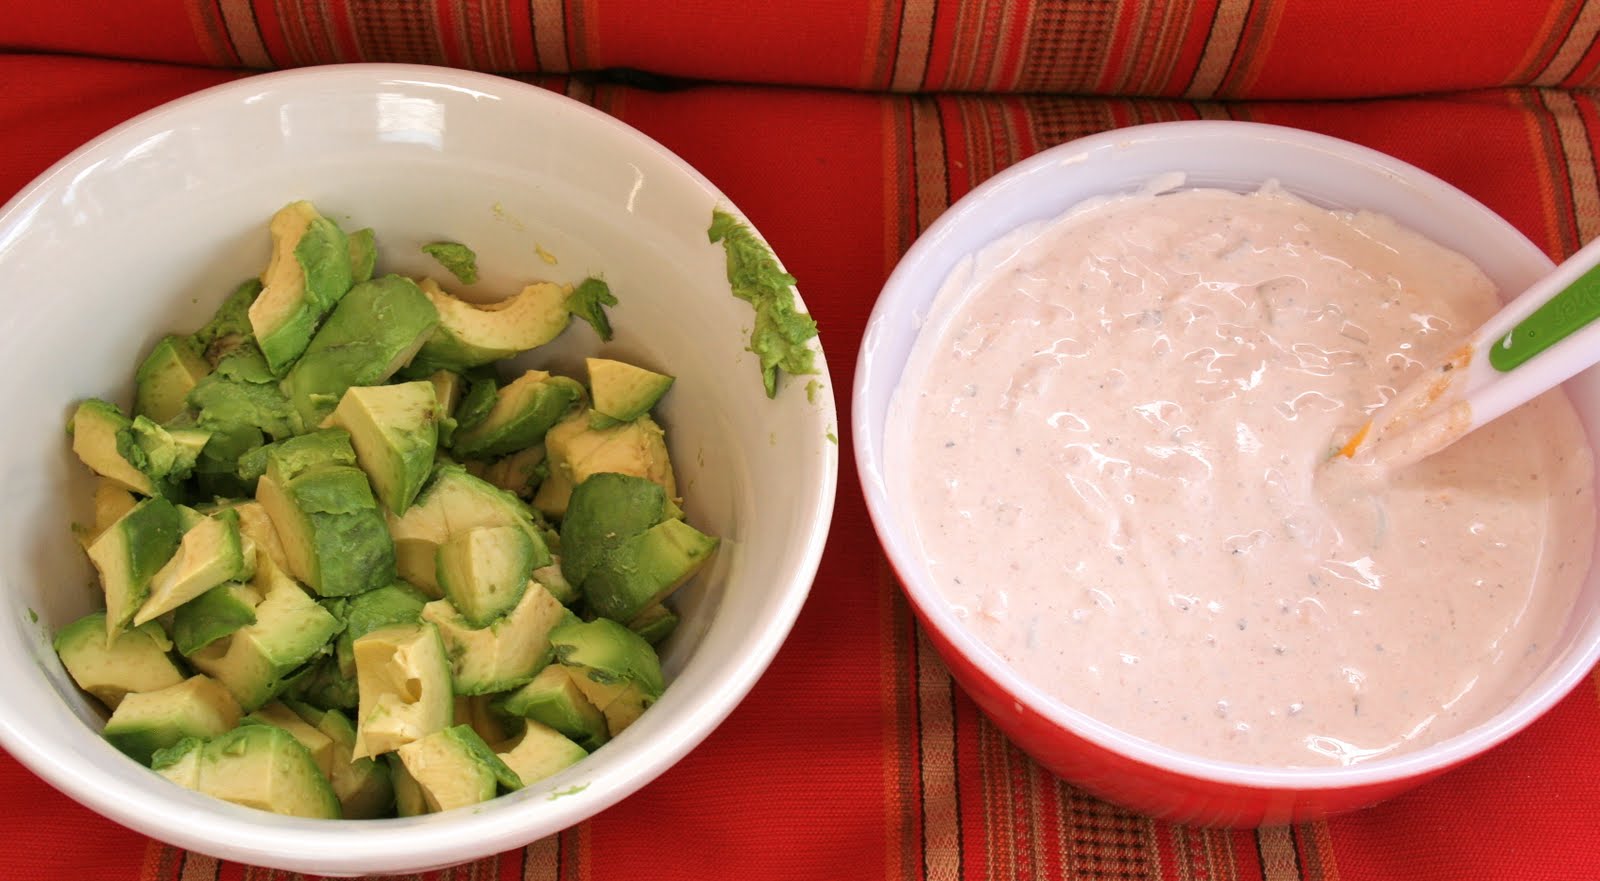
Turn the avocado over the bowl and by scoring the insides they will fall out easily.

In a separate bowl mix together the other ingredients, sour cream, cilantro, cumin, salsa, hot sauce, shredded cheese, and salt and pepper.

Fold sour cream mixture into avocado and cover. Chill for an hour. When ready to serve, top with shredded cheese, chopped tomato, green onion, and cilantro.


Creamy Avocado Dip

4 whole Avocados
2 cups Sour Cream
1/2 cup salsa
2 tsp. ground cumin
2 tsp. hot sauce
1/4 cup cilantro, rough chopped, plus additional for topping
1/2 cup shredded cheddar cheese, plus additional for topping
Salt and Pepper to taste
1 medium tomato, chopped
2 green onions

Begin by halving the avocado and removing the pit. Score the inside and empty into bowl. In a separate bowl mix sour cream, salsa, cumin, hot sauce, cilantro, and cheddar cheese. Add some salt and pepper to taste. Fold in avocado, cover and chill for one hour.

Top with cheddar cheese, tomato, cilantro, and sliced green onions. Serve with tortilla chips or crackers.

Another Round of Cookie Dough

This recipe is easy! Taking some help from the store bought and then making some homemade "egg less" cookie dough. I used a 9x13 pan this time around. However, I think in the future I would use a smaller pan and make 1/2 of the cookie dough recipe. This is easy to do and produces crowd pleasing results!

No step by step directions for this dessert, other than, make the brownies according to package directions, let cool. Mix ingredients for cookie dough and "spread" on top of brownies. I say spread, but you may end up using your fingers to cover the brownies by piecing the dough in.


Cookie Dough Brownies

1 box brownie mix
Prepare according to package directions.

2 1/2 cups all purpose flour
1 1/2 tsp. baking soda
1 tsp. salt
1 cup butter, room temperature
3/4 cup sugar
3/4 cup brown sugar
1 tsp. vanilla
1/3 cup milk
1 cup semi sweet chocolate chips

Beat sugars with butter until light and fluffy. Add eggs and vanilla, mix to incorporate. Slowly add flour, baking soda, and salt. Stir in chocolate chips.

Spread or use your fingers to press the cookie dough on top of the cooled brownies.

Again, I think I would half the dough recipe next time and use a smaller pan size, but I don't think anyone minded the extra thick cookie dough on top of the thinner brownie!


Monday, October 24, 2011

Getting the kids involved!


Growing up I remember the special nights where my mom would let us help her make individual pizzas for dinner. They were popular for slumber parties as well. We used English muffins for our crust and then each person used the toppings to their liking. I have done this with my kids, or even used a bagel, but then watching TV one night saw an idea to use Pillsbury Grand Biscuits for a crust. I love the taste and so does my family. I usually buy the Simple Pillsbury brand biscuits, when I can find them that is. This time however I went for what they had in the grocery store. I also made a fettuccine sauce paired with some linguine noodles. (I still had a little whipping cream from my Chicken Alfredo Braid and wanted to use the rest of it up) This is a meal that everyone enjoys eating and I don't have to worry about any leftovers. We stick with the basics around here, pepperoni and sausage, but feel free to use whatever you prefer! Turns out this time around the kids were outside enjoying some not so cold fall weather so I was able to just roll, top, and bake on my own.
For the Alfredo or in this case, Linguine
For the pizza
Roll out the biscuit with a rolling pin. Not going for perfection here, so just get it nice and flat. I then place it on the cookie sheet, with a little corn meal underneath, and begin topping! Sauce, toppings, and finish up with cheese on top.
At the end I decided rather then have to bake another sheet of pizzas, I topped a few of the already made pizzas with another rolled out biscuit, pressed the edges to seal and then made a slit in the top, added some melted butter with some seasonings to the top and it turned into a calzone! Jack preferred this as it was much easier to pick up and eat.


Grands Biscuit Pizzas

1 Can refrigerated Pillsbury Grand Biscuits
Corn Meal (optional)
Pepperoni
Cooked Sausage
Shredded Mozzarella Cheese
Other assorted pizza toppings

Preheat oven to 350 degrees.
Roll dough out on a clean surface. Place corn meal on cookie sheet and then place the rolled out dough on top. Add sauce and toppings. Place in oven for 15-18 minutes.

Alfredo Sauce
Cook pasta according to package directions. Drain pasta and return to pan. I used half a box of pasta, and added 1/2 stick or 1/4 cup of butter. Add 1/4 cup grated Parmesan cheese and 4 TBLS. of whipping cream. I usually add a little more cheese right before serving.

Sunday, October 23, 2011

Crock Pot Dinner

Typically to me, a crock pot meal is one that I can throw in before I go to work for the day (I work 2 days of the week) and then when we return home the house smells wonderful and dinner is ready. This meal however does not take the typical, day long cooking time. This meal cooks on low for about 3 hours, and in that time the house starts to smell amazing! To me this would be a perfect meal for my troop when I was going out for the evening and Doug was staying home with the kids. Ha! Who am I kidding, that typically happens maybe once a month when I sneak out for book club! But, still, this would be an ideal meal to serve on nights like that. I cooked this for about 3 hours on LOW and then turned it on WARM because I could tell it was done cooking, and dinner "time" wasn't quite upon us yet. I forgot to take a picture of the ingredients for the sauce, however they are simple to throw together, I also let the sauce simmer for a little bit before assembling the meal in the crock pot. I used my mom's recipe for the meat sauce. Here is the delicious sauce, I used 1 lb. of Italian sausage which can easily be substituted with ground beef. I find that the Italian has a lot more flavor, but does add some spice to the meal, nothing mine couldn't handle, but for some it may be a little too much.
After I had let the sauce simmer it was time to get the cheese mixture, also known as, the layer of lasagna my husband could do without layer. I love it though, and I use cottage cheese, although I know many people prefer ricotta.

After mixing the cheese layer it is time to assemble the layers in the crock pot. I sprayed my crock pot with a non stick cooking spray, just to be on the safe side. Starting with the meat, spread that out in the bottom, top with some of the cheese mixture, then breaking the noodles to fit, layer the lasagna noodles over the cheese mixture. Repeat, and end with sauce on the top layer. Make sure you use regular lasagna noodles, and not the no boil, or the oven ready ones! That is the nice part of this recipe, no need to do anything with the noodles but lay them in your crock pot. As you can see, I was able to use one noodle down the middle then finished off each side by breaking the noodles up to fit. Not very pretty, but ending with the sauce as the top layer no one will ever notice!
Low heat for about 3 hours, and the last 15 minutes I added about 1 cup of shredded mozzarella cheese to the top and let that melt. The edges were a little burnt, but I love that when I eat lasagna. My husband had to ask before eating, "What's in this that I won't like?" Knowing that he probably wouldn't like the cottage cheese and the diced tomatoes in the sauce I smiled and said, "Nothing!" It worked as he had 2 nice size helpings! This picture makes my slice of bread look enormous, what can I say, I love some warm bread with lasagna and a salad!


Crock Pot Lasagna

1 TBLS olive oil
1 medium onion, chopped
1 clove garlic, minced
1 lb. Italian Sausage
1 tsp. basil
1 tsp. parsley
1 tsp. Italian Seasoning
1 tsp. salt
1 can (14.5 oz) diced tomatoes (I used fresh ones that I still had from my garden)
1 large can (29 oz.) tomato sauce
1 small can tomato paste
Heat oil, add onion and garlic for a minute then add meat and cook till no longer pink, drain. Add remaining ingredients and simmer on low
Mix together the following
2 c. large curd cottage cheese
1 egg
1/2 cup grated Parmesan cheese
2 tsp. salt
1 tsp. pepper
2 TBLS. parsley

1 box Lasagna noodles
1 cup shredded mozzarella cheese

Spray crock pot with no stick cooking spray. Layer sauce mix on the bottom, followed by the cheese mixture, then the lasagna noodles. Repeat steps, and after lasagna noodles add reaming sauce. Cook on LOW for 3 hours, last 15 minutes of cook time, sprinkle with shredded mozzarella cheese.

I have to admit, I made this to really just see if it would work. I don't mind making the traditional lasagna when I have the time, but this was definitely easy and I will be making it again this winter!


Saturday, October 22, 2011

A mild meal to please all!

Chicken comes around our table a lot. Or as my husband likes to call it, "Yard Bird." Sorry Doug, we will not be having red meat every night of the week! This turned out great, no leftovers which I always take as a good sign! I really liked this recipe because you didn't have to deal with a lot of messy batter. Most of the time when I do recipes like this, you dip the chicken in your egg wash, flour or corn starch, etc. For this recipe you make the batter up and then just put the chicken pieces in and coat. Much easier!!

I keep my ginger in the freezer and pull it out when necessary. Using a grater it is very easy to have fresh ginger whenever you need! Begin by mixing batter ingredients and letting the batter sit covered. Below is the chicken once it is added to the batter, again after letting the batter sit for about 30 minutes.
While warming the oil up for the chicken I started to heat some water for the rice. I also began to get the ingredients ready for the sauce. And this is what the end result was, and Jack loved it so much he had 3 servings! That can say a lot coming from a 3 year old!

Honey Chicken

For the Batter:
4 TBLS corn starch
1/4 cup flour
1 tsp baking powder
1/2 cup water
1/2 tsp salt
1 Egg
1 Egg White
Mix ingredients together and let sit, covered for about 30 minutes.
Prepare chicken by cutting into 1 inch cubes. I used 2 boneless/skinless chicken breast but probably would have been better off with 3.
Warm up oil in a pan to 350 degrees and add chicken to the batter and let sit for a few minutes, turning to coat.
Begin frying chicken in batches, drain on paper towel when chicken is finished, nicely browned.
Sauce:
1 1/2 TBLS oil
2 tsp ginger, minced
3 TBLS garlic, minced
Heat oil in a small saucepan and add garlic and ginger and stir fry for about 30 seconds
Mix together
1 tsp salt
3 TBLS honey
1 tsp rice wine vinegar
1/2 cup of water
Add to the garlic and ginger and mix well.
Mix together
1 tsp water
1 tsp corn starch
Add to the sauce and let simmer for about 2-4 minutes. Add to the chicken and toss to coat adding sesame seeds. Serve with white rice


Tuesday, October 18, 2011

Casserole Conversion

My husband is one of those that can look at a casserole and his stomach turns in disgust. That is, until I made this one for him years ago. I love this one and my kids do as well, and even picky Doug can handle this casserole every so often. The ingredients...simple, the taste...very comforting. We have been having some very dreary weather lately and this meal hit the spot!

Butter, Ritz Crackers, Cream of chicken, Poppy Seeds, Sour Cream, Cooked Chicken, and although the original recipe doesn't call for it, cheddar cheese. So easy you don't even need a list if you need to go to the grocery store! I just grilled up some chicken that I seasoned with salt and pepper. I went with about 3 cups of cooked chicken, maybe a little less, I used 3 boneless, skinless chicken breast. Mix all the ingredients together, minus the butter and crackers. Pour into a greased baking dish, 9x13 would be too large, I believe I used something closer to an 11x7 baking dish. Break up the crackers, not too fine, and mix with the butter and put on top of chicken mixture. Place in preheated 350 degree oven for 30 minutes and you have yourself a casserole that even the pickiest should be able to eat. That's why I called this a conversion casserole, because even Doug was converted and enjoys this meal!


Creamy Chicken Casserole
adapted from Ultimate Southern Living Cookbook

3 cups cooked chicken (Shredded or diced)
1 cup sour cream
1 TBLS Poppy Seeds
1 can Cream of Chicken Soup
1/4 cup shredded cheddar cheese
1 sleeve Ritz Crackers
1/4 cup butter (melted)

Mix chicken, sour cream, poppy seeds, cream of chicken, and cheese in a bowl. Put in greased baking dish. Place melted butter in a bowl and with your hands crumble crackers into butter, mix to coat and put on top of chicken. Bake at 350 degrees for 30 minutes. Enjoy!

Saturday, October 15, 2011

A magic cupcake

Yes, I said Magic. This is beyond your typical cupcake. I really like making baked goods from scratch but I decided with all that was going into this cupcake I could take some shortcuts. I made a homemade cream cheese butter cream icing for the top and the cake mix has a few added ingredients in it to boost up the flavor. Make these and you will not be disappointed!

Yes, that is a big pile of cookie dough, pre-made.. making it easy today! How can you go wrong with those ingredients? And then, look what happens when you mix up all your ingredients and put it in your paper liners....

You take about 1 tsp of the cookie dough, roll it up and put it right down in the center of the batter. Then cover it with a little more batter so the dough is completely covered. MAGIC!
I had some helpers along the way this time, and they pretty much approved of the batter...what's that saying..."The proof is in the pudding??" Or in this case...on their little faces!

Using the ingredients pictured below I made the frosting, as if the cupcake needed anything else added to it! But indeed, the frosting always makes the cupcake!

And then you get this. Something with a sweet surprise in the center and a very delicious cupcake. I had a lot of positive feedback on these and think I will be making them again soon!

Here they are all lined up in my container and ready to send off with Doug to work. I had some left over cookie dough and made some tiny cookies, but didn't like how they turned out, so only one cupcake got a crispy cookie on top!


Cookie Dough Cupcakes
adapted from My Baking Addiction
(this is one of my favorite baking blogs that I have followed for a very long time!)

1 box of devil's food cake mix
1 (5.9 oz) package instant chocolate pudding mix
1 cup sour cream
1 cup vegetable oil
4 eggs
2 tsp. vanilla extract
1/2 cup warm water
one package of refrigerated cookie dough

Preheat oven to 350 degrees and prepare your muffin tin with either paper liners or cooking spray. In a large bowl mix together the cake mix, pudding mix, sour cream, vegetable oil, eggs, vanilla extract, and warm water. Distribute the batter between 24 muffin wells. I used the recommendation of about 3 TBLS of batter per muffin well. Break up cookie dough and take about a tsp. of dough and roll into a ball. Drop in the center of the cupcake and using a spoon, or adding a little more batter cover the cookie dough completely.
Bake for 18-22 minutes or until toothpick entered into the center of the cupcake comes out clean. Remove cupcakes and allow to cool completely before frosting.

Cream Cheese Frosting

1/2 cup butter (one stick) Set at room temperature for 10 minutes, should still be cold
8 oz. cream cheese directly from fridge
1 tsp. vanilla extract
4 cups powdered confectioners sugar
1-4 TBLS. Heavy whipping cream or milk

Begin by putting the butter in large mixing bowl and mix slightly. Add cream cheese and combine for about 30 seconds. Add vanilla extract and powdered sugar and mix on low speed until combined. Increase speed to medium until mixture becomes fluffy. Begin to add the whipping cream, a TBLS. at a time till you reach the desired consistency. I usually add about 3 because I don't want it to be too runny when I pipe it on the cupcake. Beat about a minute till fluffy. This will be more than enough to spread on the cupcakes and should frost about 22-24 cupcakes if you pipe on your frosting.

Enjoy! And don't tell anyone what's inside, it is much more fun to see their faces when they bite into the unexpected!


Friday, October 14, 2011

That's a wrap!

I know it was a surprise to my Aunt Kathy that this wasn't my first post for my blog. But it honestly didn't even cross my mind till I saw her comment, "Don't forget the wraps!" This is a simple dinner that I don't make too often but for awhile whenever I visited my family back in Carmel they requested..and then a call was made to Aunt Kathy to come on over cause, "Amy was making her wraps!" Of course wraps have become popular over the years, I started making these while working at a cafe in the Purdue Student Union. Not much required for this dinner! I made homemade, the not so healthy fries, for our side, not gaining any healthy dinner points tonight, but pretty sure every once in awhile that's OK!

Just a simple line up, some veggies, meat, cheese, a little mayonnaise, and tortilla shells.


I just buy the deli roast beef, and I try to get the rare roast beef. I don't know why but I was told this was rare, but there is no red in it at all. No big deal, but since I end up cooking it all up I don't like it to get real dry. Begin by slicing up the onion and pepper and put them in some butter to start to soften. Cut up the roast beef, I make the pieces small, again for little mouths to eat, but also it is nicer for anyone to just have bite size pieces so when you take a bite the whole piece of meat doesn't come out all at once. Add the meat to the pan and then some mayonnaise. While this is warming up slice the cheese into fourths.

Once the meat is combined and warmed up with the veggies, place about 4 slices of cheese down the center of a tortilla shell. I usually put two at a time on a cookie sheet.


Place the tortilla shells in the oven and let the cheese begin to melt. This is something you have to keep an eye on, because if you leave the shells in for too long, they start to get very crispy. Once the cheese looks like it is melting, it is time to pull it out, once you have the meat on the cheese, it will finish melting. Put the meat on the cheese and begin to wrap! I start on one of the long sides and make my way around, and then the last fold I turn it over and place it on a plate. It's not much, but it is very delicious!


Roast Beef Wraps
serves 4

1 lb. Deli Roast Beef
4 slices Provolone Cheese sliced into fourths
1 Red Bell Pepper or you could use a yellow or green bell pepper sliced into strips
Burrito Size Tortilla Shells
1 TBLS. Butter
1-2 TBLS. Mayonnaise

Place butter in a pan and melt. Place sliced onion and peppers and begin to cook over low heat to soften. Preheat oven to warm or about 250 degrees. Add meat to the pan and heat through. Add the mayonnaise. Place about four of the cheese slices down the center of the tortilla shell and put in the oven for approximately 5 minutes, again, not for too long so keep an eye on it. Take out and spread some of the meat mixture down over the cheese. Beginning on one side start to fold over and continue in a clockwise direction.


Wednesday, October 12, 2011

A home run!

I am not going to take credit for this one! My friend Annie (who wanted to remain anonymous) came up with this! We both like to find recipes on the website, "Life as a Lofthouse"http://life-as-a-lofthouse.blogspot.com/, and Holly has a couple of different ideas for the "braid". However, Annie wanted to give this version a try. I was all for it and the results were amazing! The basic braid instructions are on Holly's blog and the possibilities for this are pretty much endless!


I started off with 2 chicken breast, marinated them for a couple hours in some Italian dressing. I grilled them inside as my husband was busy for the night and wasn't around. (I can grill, but turning on our grill requires a bit of magic that I don't have!)

While I was grilling those I took out my refrigerated pizza dough and rolled it out on a greased cookie sheet and let it come to room temperature while I finished grilling the chicken. I also started my sauce for the chicken, a very simple Alfredo sauce.
When the dough is easy to work with, spread it out on the sheet as if you were going to make a pizza and starting on side go down and make a cut about every one inch the way down each side, leaving about a 4 inch column down the middle.

Once the chicken is finished grilling let it rest while you make the Alfredo sauce. Just chicken and sauce would not do for me, so I added some sauteed red peppers and red onions to my end of the braid.

Next start assembly! I started by putting down the chicken on the dough. Then on my section only of course added the onions and peppers. Then I drizzled the sauce down the chicken, I think you could also just add the chicken into the sauce before you added it all to the dough. Next I layered the chicken with shredded cheese and then started to braid my dough. I can't make this look pretty but appearance isn't everything...right!!?! Then I added my olive oil that I mixed with some seasonings and brushed on the top of it right before putting it all in the oven. The last five minutes of baking I also added more cheese! The results were amazing! My kids asked for seconds and when my husband got home later that night, well let's just say I didn't have any leftovers for the next day! Hopefully Annie will keep coming up with ideas like this one! Enjoy!

Chicken Alfredo Braid
with help from Annie and Life as a Lofthouse

1 can refrigerated Pizza Dough
Boneless/Skinless Chicken Breast
Italian Dressing
1/2 cup heavy whipping cream
2 TBLS Butter
3/4 cup grated Parmesan Cheese
Shredded Mozzarella Cheese
2 TBLS Olive oil
1/2 tsp. Garlic Powder
1/2 tsp. Basil
1/2 tsp. Thyme

Being by marinating chicken breast in Italian Dressing, recommended at least 2 hours. When ready, preheat oven to 375 degrees. Take refrigerated pizza dough and spread on greased cookie sheet, set aside. Grill Chicken. Melt butter with heavy whipping cream and add Parmesan cheese, whisk till smooth and remove from heat. Cut one inch size strips down the side of the dough, repeat on other side. Place the chicken on dough down the center, drizzle sauce over chicken and sprinkle with Mozzarella Cheese. Braid and tuck as you go sealing up any openings. Stir together olive oil with Garlic powder, Bail, and Thyme and brush over braid. Bake at 375 degrees for 20-25 minutes. The last five minutes of baking time add more shredded cheese to top of braid.


Monday, October 10, 2011

Who doesn't love a little Paula Deen?

What is this?! This is amazing and comes together so fast and then cooks in your crock pot for about 3-4 hours. So in no time you have an amazing dessert for your family or even to entertain with. My sister in law, Kim, made this one day at my in laws and I was so impressed. That has been a few years and I finally made it for my family while I was them in Indiana. The ingredients are simple and the results are amazing!

Simple ingredients and most of them you probably already have on hand!

Right before I put the lid on. No, it is not burnt, it hasn't even started to cook yet, this is the sugar/cinnamon sprinkled on top. It just adds so much flavor. How can it not?!!

Slow Berry Cobbler
from Paula Deen


1 (10 oz) Bag Frozen Strawberries
1 (10 oz) Bag Frozen Blueberries
1 (10 oz) Bag Frozen Raspberries
Or~
I used a large bag of strawberries then a 10 oz bag of mixed berry
Mix fruit in large bowl and add
2/3 cup of sugar
1/2 cup of baking mix
Stir together and place in a lightly sprayed crock pot.
For topping mix together the following:
2 1/4 cup baking mix
1/4 cup sugar
1/2 cup milk
4 TBLS. melted butter
With your hands drop bits of the dough over the fruit.
Mix together 1/4 cup sugar with 2 teaspoons of ground cinnamon and sprinkle over the top.
Cook on HIGH for 3-4 hours.

Oatmeal and Chocolate Fudge? Yes Please!!


There is a small bakery in town that my sister in law, Kim, used to talk about this oatmeal chocolate bar they had that was delicious and a must try. I agree, they were good, however just recently I wanted to make an at home version that was even better. Kim has since moved to Seattle and probably hasn't had one of these treats for years..so when she comes back for Christmas this year I will be putting these to the test. I am sure she will agree they are delicious! I had the urge to make these one night when everyone was in bed so the pictures aren't great, not that I can blame my bad photography on my kitchen lightening, but I will try. I left my husband a note to cut some up in the morning and take them to work with him. I did not feel like waiting up till the early morning hours when they had cooled off to slice them up. He took half the pan and when I asked him what he thought of them, he told me that he didn't try one cause they were eaten up so fast. Perfect!

Oatmeal Fudge Bars
adapted from Allrecipes.com

3 cups Quick Cooking Oats
2 1/2 cups all purpose flour
1 tsp. baking soda
1 tsp. salt
1 cup butter (softened)
2 cups brown sugar
2 eggs
2 TBLS. vanilla (divided)
1 (14 oz.) can sweetened condensed milk
2 cups semi sweet chocolate chips
2 TBLS. butter
1/2 tsp. salt

Preheat oven to 350 degrees and grease 9x13 pan. In large bowl, beat together 1 cup of softened butter and brown sugar. Mix in eggs and 1 TBLS. vanilla. In separate bowl mix together oats, flour, baking soda and 1 tsp. salt. Combine with butter mixture and set aside.

In medium sauce pan heat sweetened condensed milk, chocolate chips, 3 TBLS. butter, 1 TBLS. vanilla extract, and 1/2 tsp. salt over low heat, stir until smooth. Remove from heat. Press about 2/3 of the oatmeal mixture into the pan and spread chocolate mixture over the top. With your hands, drop the remaining oatmeal mixture over the top of the chocolate. Bake at 350 degrees for 30-35 minutes, careful not to over bake! Let cool completely to allow the chocolate to set. Cut into bars.

If you would like you can add some sliced almonds, or pecans to the chocolate mixture while it is on the stove top.


"CCC" Cup Cake Craze!

I recently have tried my hands at the cupcake world. Last Thanksgiving I made some adorable turkey cupcakes, they turned out cute and were fun to make. Haven't tried much else till recently when I decided to volunteer myself to make the cupcakes for my Stella June...no not my third child, my adorable beyond words niece who turned ONE in September. I was so excited and spent countless hours putting together my sketches and ideas for her cupcakes. The theme was already decided and here are the final results. Can you tell by my cupcakes what theme was chosen?

Before the birthday party I tried making the cheeseburger cupcakes I found on Glorious Treats (http://glorioustreats.blogspot.com/). Such a cute and somewhat simple take on cupcakes, and definitely a conversational piece at the cookout I took them too.


Sunday, October 2, 2011

My own take on Chinese Take out

For most people it is probably easy to drive and pick up some carry out for dinner. Not for me. I live out in the country, although I can get somewhere in about 10 minutes, it is still not too convenient. A basic stir fry is easy and can be very delicious. I made one for my family the other night. The results: Grace said, "This makes my lips feel good." Jack, said, "More, more more." He had 3 helpings of the chicken. My somewhat, make that, very, picky dear husband did what I consider a "thumb's up", he kept quiet and just ate! Hope I got my measurements all pretty precise, however that is the nice thing about a stir fry, a little of this, a little of that, and you have yourself a meal! Enjoy!


Begin by cutting up the chicken breast. I used three in this meal. I made them pretty bite sized, easy for my kids to eat. Sprinkle chicken with salt and pepper. Place cut up chicken in a gallon size zip lock bag and add corn starch, ginger, garlic, and soy sauce. Place in refrigerator for about 30 minutes.


Once you are ready to cook the chicken heat oil in a pan. I also added a little hot chili oil and a splash of sesame oil. I then added my version for the stir fry, red pepper, onion, and zucchini. I knew the rest of my troop wouldn't appreciate the veggies, but I LOVE them. So I added those and let them cook for about 5 minutes then transferred to a plate.


Making sure the oil is still nice and hot, add the chicken and cook till nicely browned.


When the chicken is done and no longer pink inside add 1/2 cup to 3/4 cup brown sugar. I use light brown sugar, however I believe that in a traditional stir fry, the dark brown sugar would be preferred. Next add one tablespoon of rice wine vinegar. Let the sugar turn into a glaze. I of course probably added closer to a cup of brown sugar, it was just so yummy looking and I thought, what's a little more sugar going to hurt!? Turns out...NOTHING! Right before taking out of the pan add a splash of soy sauce, give it all a nice stir.

I would typically use rice with this meal however tonight I felt like noodles, and right before serving I added some green onions to the top! Delicious!


Stir Fry Chicken


3 chicken breast-cut up into about once inch cubes
Salt and pepper the chicken
Put into a gallon zip lock back and add
1/2 cup corn starch
1 tsp. ground ginger (or fresh)
1-2 garlic cloves
a dash of soy sauce

Throw that all in the bag and give a good shake.
Put in fridge for 30 minutes

Heat about 1-2 tbls of oil in a skillet add a splash of sesame oil and hot chili oil (both optional).
Once oil is heated, add veggies to pan, if omitting, put chicken in pan.

Cook chicken till it starts browning up nicely and no longer pink.
Add about 3/4 cup brown sugar and 1 tbls of rice wine vinegar,

Let the sugar all dissolve into the chicken, adding more if you feel like it~

Right at the end throw a splash of soy sauce in.

Serve over rice or thin noodles and top with green onions