sunset harvest

Thursday, March 29, 2012

Honey Roasted Chicken and Veggies

I have roasted a chicken in the oven countless times, however when I read how Jessica made a recent roasted chicken on How Sweet It Is, I had to give this method a try! I love how she added veggies to the cooking dish and then placed the chicken right on top. The vegetables cooked in all the juices and turned out amazing. Doug loved the potatoes, which, coming from him is a big deal. I loved it all, the chicken stayed moist and was perfect. The skin got a little brown, however we typically take the skin off before eating anyway so it wasn't a problem. If you like to eat the skin, I would maybe cover the chicken half way through cooking it. Make this for your family and you will have smiles all around the dinner table!
In the past I usually just seasoned my chicken with some seasoning and rubbed olive oil on the chicken. But adding the honey first and rubbing it all over the chicken added so much flavor to the dish! I loved it, wait, didn't I mention that already? I have to, because this chicken deserves it! If you have a chicken phobia, it is time to get over it! I admit, I don't enjoy cleaning one of these roasting chickens. Taking out the neck, the giblets, not a fan. I wash the chicken and take out the insides, and pat dry. Take some small red potatoes and slice them in half, quarter up an onion, and place them in a bowl, add some olive oil and about a teaspoon of honey and stir to coat. Place the vegetables in a 9x13 baking dish. Place the chicken on top, and sprinkle some salt and pepper over the chicken. Add about a tablespoon of honey to the chicken and rub over to coat. Add olive oil to chicken and rub to coat. I waited till about half way through the cooking time to add the asparagus to the dish. Place in oven and wait, if you can! Once the chicken was almost finished cooking I couldn't help but keep taking some of the onions and potatoes out and eating them. Delicious!
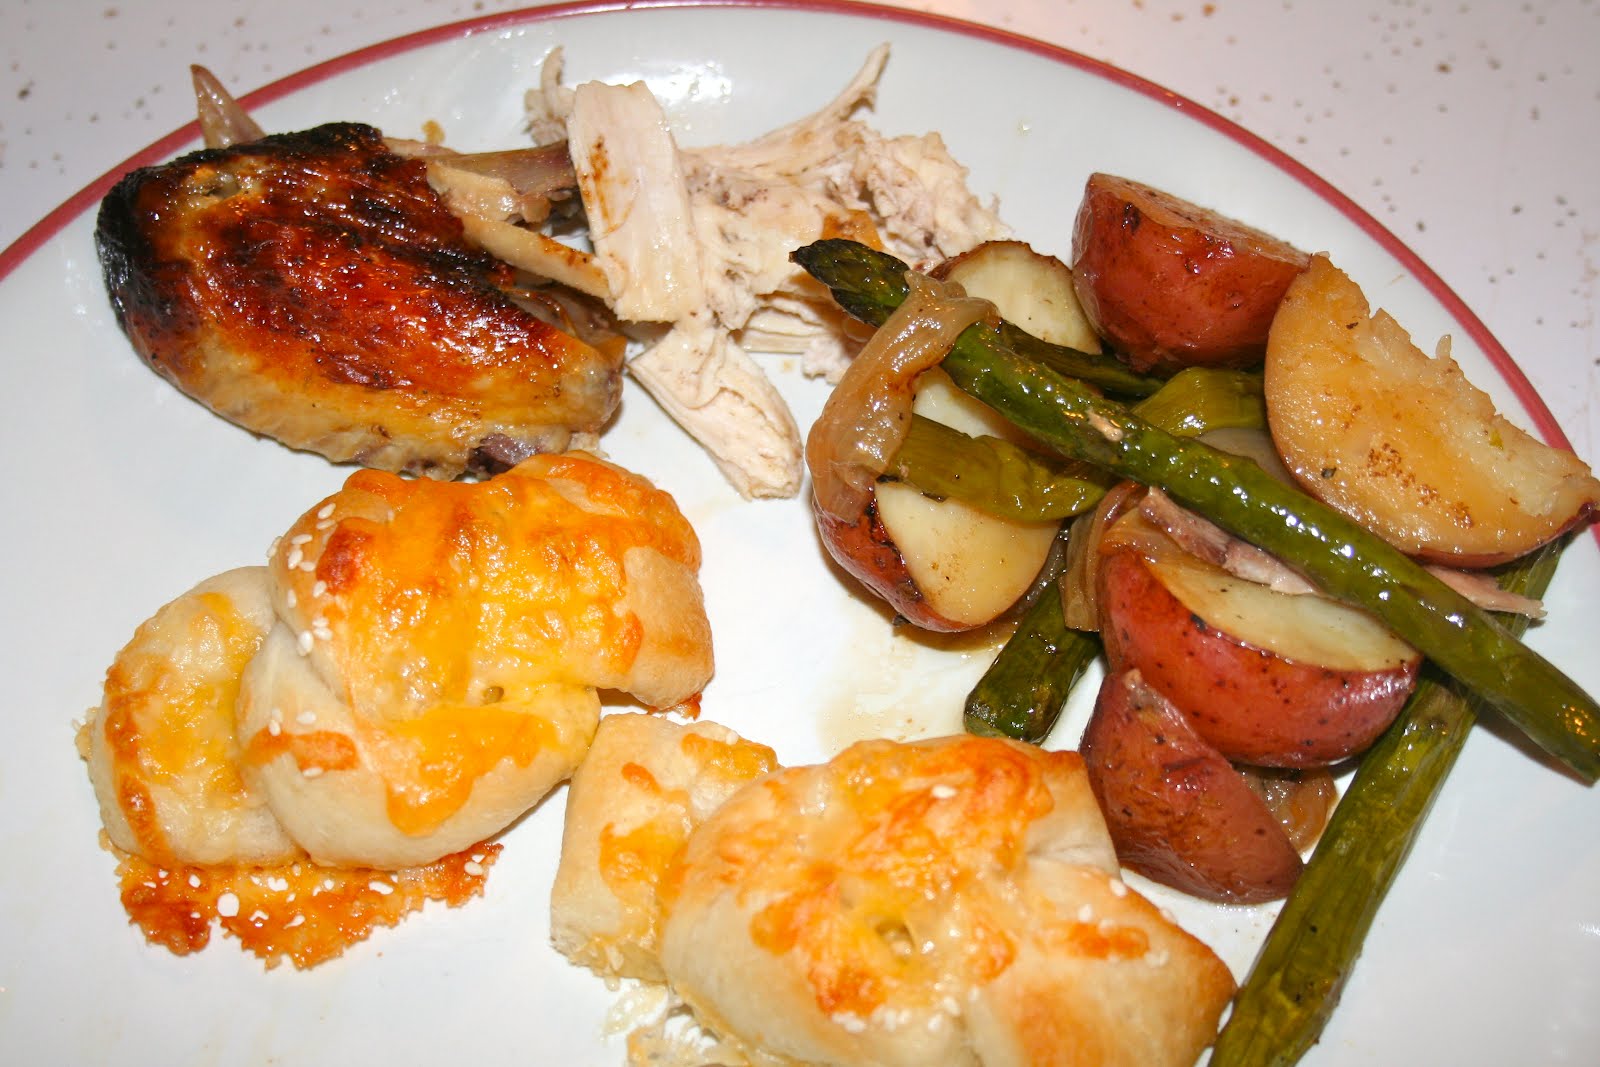
I added some cheese to my sesame knot rolls and baked those while I let the chicken rest. They completed the meal!

Honey Roasted Chicken
adapted from How Sweet It Is

1 Whole Roasting/Fryer Chicken
1 yellow onion, quartered and separated
10 small red potatoes, halved
12 asparagus spears, cut in half
4 TBLS olive oil
4 TBLS honey
Salt and Pepper

Preheat oven to 425 degrees.

Place onions and potatoes in a mixing bowl and pour 2 TBLS of the olive oil into the bowl. Using your hands, stir the vegetables around to coat. Sprinkle in some salt and pepper and add 2 TBLS of honey and continue to stir to coat. Pour the vegetables into a 9x13 glass baking dish. Add asparagus to the bowl, and set aside.
Rinse and remove the insides from the chicken. Pat dry and sprinkle with slat and pepper. Pour 2 TBLS of honey over the chicken and rub over chicken to coat. Pour the 2 TBLS of Olive oil over chicken and again, rub all over to coat. Place the chicken breast side up on top of the vegetables. Place in the oven, once placing the chicken in, I turn the oven down to 350 degrees and let it go. This takes about 80-95 minutes to cook. Make sure to add the asparagus half way through the cooking time. Use a thermometer to make sure chicken is cooked through, 180 degrees when placed in the thigh. I check a few places on the chicken to make sure it is done! Once chicken is finished, remove and let rest for 10 minutes before cutting it up to serve.

Sunday, March 25, 2012

Grilled Cilantro Lime Chicken

Thank you Pinterest! I saw this the other day and immediately wanted to make it for dinner. I was unsure how the family would react to the Cilantro flavor, however they didn't seem to mind at all. I was of course hoping to have some left over chicken to have the next day for lunch, but not this time around. This chicken was very flavorful and I will be making this again! I made this marinade first thing in the morning, I think chicken does better the longer it sits in the marinade. This marinade made plenty for 3 chicken breast, and next time I will add a few more chicken breast to the marinade. I think this chicken would taste great the next day!
In the bottom of a baking dish, or whatever you typically use to marinade your meat in, place the soy sauce, oil, honey, garlic, and lime juice and stir to combine. Cut the chicken into large chunks and place into marinade. Sprinkle with chopped cilantro, cover and refrigerate.
After a couple hours, stir the chicken to make sure every piece has time in the marinade. When you are ready, thread chicken onto skewers, I used wooden ones and soaked them in water for about 20 minutes prior to placing the chicken on them. Grill for 6-7 minutes on each side till cooked through. Prior to serving sprinkle on some more cilantro and squeeze more lime juice over the top if desired. Not knowing how Doug and the kids would react, I only added the extra cilantro and lime juice to my chicken. Everyone enjoyed this dinner, I served a side salad and rice alongside and had the perfect meal!

Add Image
Grilled Cilantro Lime Chicken

3-4 boneless/skinless chicken breast, cut into large chunks

Mix together;
6 TBLS soy sauce
4 TBLS honey
2 TBLS vegetable oil, I use Canola
Juice of 1 Lime
2 tsp. minced garlic

Add in chicken and top with chopped cilantro. Marinade for 4-6 hours, turning once to coat.
Grill the chicken on bamboo skewers that have been soaked in water prior to placing the chicken on them. Serve with lime wedges and additional cilantro to sprinkle on top.

Friday, March 23, 2012

Crab Cakes

This is a recipe didn't come easily from a certain family member, after much begging I was finally given this recipe as long as I kept it for myself, well..it is too good not to pass on! This makes quite a few so invite some friends over for dinner, some seafood loving friends that is!
In a large bowl start by beating 2 eggs. Add in 1 1/2 c. of white bread, we used wheat because that is what we had on hand! Remove the crust and dice the bread, it is about 4 slices of bread. Add mayo, mustard, old bay, parsley and diced onion to eggs. Add in bread and gently stir in crab meat, careful not to break up the crab meat too much. From into balls, they should hold their shape and place on a sprayed cookie sheet, or a cookie sheet lined with parchment paper.
Place in preheated oven, 350 degrees and bake for 30-40 minutes.
While those are in the oven, in a small saucepan it is time to heat up the sauce to drizzle over the crab cakes when they come out of the oven.
Just three simple ingredients for this step. 1/2 cup butter, 1 tsp. Old Bay and 1/2 squeezed lemon. Warm in saucepan and keep warm to pour over the crab cakes. We drizzled once the crab cakes were placed on the plates. There is also a sauce to either spoon on top, or you could serve along side to dip the crab cake in. This dip can be made in advance or before you start making the crab cakes.
In a small bowl, combine mayonnaise, Dijon mustard, Worcestershire sauce, and ground mustard. Again, can be used as a dressing or served on the side to dip.

"Not to be shared" Crab Cake Recipe

2 Cups Crab Meat (if you live by a Costco or Sam's, look for the Phillips brand and buy 1 16 oz. can)
1 Cup Hellman's Mayonnaise
1 TBLS Dry Mustard
1 1/2 TBLS Old Bay Seasoning
1/2 cup fresh parsley
1 small onion, diced
2 eggs, beaten
1 1/2 cup white bread, crust removed and diced (about 4-5 slices of bread)

Preheat oven to 350 degrees

In large bowl, beat eggs together and add mayo, mustard, Old Bay, parsley and onion. Mix well. Add in bread and gently stir in crab meat, careful not to break up the crab meat. Form into balls and place on parchment lined baking sheet, or spray cookie sheet and place formed balls on the prepared sheet. Bake for 30-40 minutes

Meanwhile, in a small saucepan, warm the following;
1/s cup butter
1 tsp. Old Bay seasoning
1/2 lemon, squeeze the juice into the saucepan

Keep warm and when ready to plate the crab cakes, drizzle sauce over each crab cake.

For dip mix together the following;
1/2 cup mayo
1 1/3 TBLS Dijon mustard
3 shakes of Worcestershire sauce
1 tsp. dry mustard
Serve along side crab cakes


And I couldn't resist, since tonight the Xavier Musketeers take on Baylor in the sweet 16 NCAA basketball tournament. I love these three more than words can describe. I hope X can pull out a WIN tonight for my dad, their absolute biggest fan!

Tuesday, March 20, 2012

Aunt Kathy's Strawberry Pie

My Aunt Kathy is the pie maker in the family. Whether it was a holiday, or a family get together, Aunt Kathy would be responsible for bringing one of her excellent pies. This is her recipe for strawberry pie, and it is nothing less than fabulous. Lucky for me she has shared a few of her wonderful recipes with me. I may have jumped the gun and made this a little early this year, it is only March, however with temperatures above 80 degrees it fells more like May or June.
First things first, the delicious crust! It isn't your typical pie crust, it is more of a shortbread, almost like a cookie crust. It is simple and easy to prepare. In a pie pan mix together flour, sugar, salt, oil and milk with a fork. Keep working the mix and when it is combined press into the bottom and sides of the pan.
Once the crust is prepared, bake in a 375 degree oven for about 12-15 minutes, or until lightly browned. While that cools, begin to work on the filling.
While the crust is in the oven, begin working on the filling. In a small saucepan stir together sugar, corn starch, corn syrup, and water. Bring to a boil and stir till clear.
Once the mixture is clear remove from heat and add 3 tablespoons of strawberry jello. Set aside to cool. Pour mixture into pie crust and layer in strawberries, approximately 1 quart.
Chill and serve. I served this with a nice scoop of vanilla ice cream on top of each slice. We had some friends over for dinner and served this, I wish I was able to get a better picture, but this is what I ended up with after I had served everyone. Try this pie and you will not be disappointed! (At least I hope not!)

Strawberry Pie
from Aunt Kathy

Mix the following ingredients in a pie pan
1 1/2 cup flour
2 TBLS sugar
1/4 tsp salt
1/2 cup oil (I used canola)
2 TBLS milk

Bake crust in oven, 375 degrees for 12-15 minutes. Remove and set aside

For filling;
3/4 cup sugar
2 TBLS corn starch
2 TBLS corn syrup
2 cup water
Bring to a boil in small saucepan, stir until the mixture starts to look clear. Add in
3 TBLS Strawberry Jello

Set aside to cool. Pour into crust and stop with approximately 1 quart of washed, sliced strawberries.

Chill and serve, preferably with a scoop of vanilla ice cream

Saturday, March 17, 2012

Ginger Salmon

I guess since it is Lent I will stick with a fish theme for one more post. I have had this twice in the last 2 weeks, I love the simplicity and the taste. Tonight the kids and Doug had some ham and I went with Salmon and Grace and Jack actually preferred the salmon to the ham. I can't say that I blame them!
Easy ingredients, Fresh Salmon, soy sauce, brown sugar, Dijon mustard and ground ginger. Mix them up and place in a small bowl or dish, place salmon flesh side down in marinade and let sit for about 1 hour in the refrigerator, turning once. When ready, place skin side down in a foil lined baking pan and bake for 15-20 minutes at 350 degrees, or until salmon flakes easily.

Ginger Salmon

1 TBLS Dijon Mustard
1 TBLS brown sugar
1 TBLS soy sauce
1/4 tsp. ground ginger

This will be enough for about a pound of salmon and is less than I even use, as it is just me and the kids, so I would double this if you were making more.

Mix together ingredients and place in either a resealable plastic bag or a small dish. Place salmon flesh side down in marinade and place in the refrigerator for one hour, turning once.

Preheat oven to 350 degrees and place salmon, skin side down, on a foil lined baking sheet, sprayed with cooking spray. Bake for 15-20 minutes or until salmon flakes easily.

Tuesday, March 13, 2012

Asian Salmon Patties

Doug wasn't around tonight, with the warm weather he has an early jump on fishing this year. I seized the opportunity of him being gone and made one of my favorite dinners. A meal that he wouldn't touch with a 10 foot pole, yet he will use his fishing pole to catch fish all day and night. This is a meal I love and my kids eat. And I try making them a little different each time I make them, but this is my favorite way to prepare them. I use canned salmon, skinless and boneless. I have read many times over and over that fresh salmon is very good to use, but for convenience sake, I stick with the can. This is just enough to make 4 salmon patties. I would suggest doubling if you have more than 3 eating, the kids each ate one and I will admit it, I ate two. I thought I could save the last one and have it for lunch tomorrow but decided to eat it when it was fresh from the pan.

Combine the salmon, diced onion and celery, old bay seasoning, sesame oil, and soy sauce. Just use a for to combine and add crushed crackers. Continue to mix till all Incorporated. I had intentions of making the patties then coating them in the beaten egg and then coating in the Panko bread crumbs. However, they were a little too dry so I added the egg to the mixture and then some of the Panko. The exact mixture is something that you just have to work with. Once I had them in patties I placed in hot canola oil and browned on both sides. It was easy to use a turner and slide the off into the hot oil. Once they start cooking they will firm up. It only takes a few minutes on each side and they are ready to eat! I made a quick dip to go along with them as well, Grace and I put a little bit on top of the patty, while Jack preferred to cut his salmon patty up and dip the pieces in.

Asian Salmon Patties

1 can boneless/skinless salmon
1/4 tsp. Old Bay Seasoning
5 butter crackers, crumbled
2 TBLS. diced celery
2 TBLS. diced onion
1/4 tsp. soy sauce
1 dash sesame oil

Mix ingredients together and add;
1 egg, beaten
1/4 cup Panko bread crumbs

Heat canola oil in pan and add salmon patties. Cook on each side till brown.

Optional:
Mix 1/4 cup mayonnaise with 1/2 tsp. soy sauce and 1/4 tsp. of sesame oil.


This recipe has been linked up at Life as a Lofthouse Weekend Potluck 

Saturday, March 10, 2012

Andes Mint Brownies

I had an extra bag left over from when I made cupcakes with Andes mints last week. I could have just opened the bag and ate them, but that is what would have been the problem, I, alone possibly would have consumed the entire bag. So I found some cute brownies with Andes Mints from Jamie at My Baking Addiction. I have been making a lot of cupcakes lately so brownies seemed like just the right thing to make. I took some help and used a box of brownie mix for these, next time I want to make it all from scratch but this seemed like a faster route. I ended up doubling the box mix, I wanted to make the brownies tall and in a 9x13 pan, with only one box I didn't think they would be tall enough. However, next time I will stick to one box, as they don't need to be super tall with the toppings that I added.
Make up the brownies according to package directions, I used two sheets of aluminum foil and laid them in the pan and folded over the sides. Spray with cooking spray. The aluminum foil worked really well and it was easy to just lift the aluminum foil out for when I was ready to cut the brownies later on.
Once the brownies are cooled, make the mint layer, or in my case, just an icing layer. I had bought peppermint extract last week but when it came time to actually finding the bottle, it became a mystery. I looked for it for several minutes and gave up, not adding it was fine with me! The Andes mints on top were enough mint flavor for me! In a stand mixer or using a hand mixer, blend together softened unsalted butter, powdered sugar, whipping cream, and if you like the extra mint flavor, peppermint extract. Once blended, add in some green food coloring till the desired color is achieved. Spread on cooled brownies and place in the refrigerator to firm for about 10 minutes.
While those are chilling prepare the chocolate glaze. Place chocolate and butter in a heatproof bowl and bring some water to a boil in a small saucepan, once the water is simmering place the bowl on top and melt, stirring till smooth. Once melted, spread over the top of the brownies, top with some Andes mint that are roughly chopped. Place in the refrigerator for about 30 minutes. Remove the pan and pull out the foil and slice.
Chocolate Andes Mint Brownies

Prepare brownies according to box directions, or if you are feeling that extra ambition, make up a batch from scratch.

Once brownies have cooled, mix together :
2 TBLS unsalted butter, softened
1 cup powdered sugar, sifted
1 1/2 TBLS heavy whipping cream
1/2 tsp. Peppermint extract (optional)
Add green food coloring to achieve desired coloring.
(I typically use Ameri color gel food coloring, but this time I used some Wilton food coloring. This is more concentrated and wont' take on the flavor of the dye which in my opinion is completely necessary!)
Add in extra cream if it is too thick, you want it thin enough to spread

Spread over cooled brownies and place in refrigerator to firm, approximately 10 minutes.

In a double broiler, or just in a heatproof bowl, place
6 oz. semi sweet chocolate, chopped
2 TBLS unsalted butter
Heat water to simmer and melt chocolate and butter, stir till smooth

Spread over mint layer. Rough chop Andes Mints and sprinkle over the top. Place in the refrigerator to set, approximately 30 minutes.

Cheddar Herb EASY rolls

Do you ever have those nights at dinner when you feel like you need to add one more little thing to make the dinner complete? This is the addition to your meal that will do that for you! I saw something similar to these at Life as a Lofthouse and decided to add basically what I had in my kitchen already to make these dinner rolls.
Simply cut the rolls or biscuits into small bite size pieces. Melt the butter and stir the in the dough. Add cheese and seasoning, continue to stir to coat all the dough.
Place 6-7 pieces of dough in a prepared muffin tin. Bake at 400 degrees for 10-12 minutes.

Cheddar Herb Dinner Rolls

Preheat oven to 400 degrees.
Spray muffin pan with cooking spray.

1 can refrigerated biscuits, cut into fourths
5 TBLS. butter, melted
1 tsp. Italian Seasoning
1 cup shredded cheddar cheese, I prefer sharp cheese

Once the dough is in fourths, place in bowl and add melted butter, seasoning and cheese. Stir to coat completely and place 6-7 pieces of dough in each muffin tin. Bake for 10-12 minutes or until browned.


Friday, March 9, 2012

Rainbow Cupcakes

I don't necessarily have a recipe for these, as I used the help of a box mix to make these. I did however add a box of instant pudding to the cupcake mix when I was mixing the batter. I ended up with about 16 cupcakes, so next time if I do this method with a box cake mix, I will double the recipe so I can get more cupcakes. I divided the batter into five smaller bowls, I had five colors I wanted to use.
Starting with the blue, I added a layer of the blue batter, followed by the green, yellow, orange, and then red at the top. You only need a thin layer of each color, any more and you will be better only putting three colors in each liner. Once cooled I used my favorite cream cheese butter cream recipe and added some white gel coloring to make the frosting a bright white. I looked for some gold sprinkles, but settled for a tube of gold gel icing and just made little dots to try and get the end of the rainbow cloud/pot of gold effect.

Wednesday, March 7, 2012

Creamy Chicken Enchiladas

This is one of those meals that somehow gets knocked aside during our dinner rotation, and every time we eventually have it, the comment is usually made, "Why don't we have this more often?" I needed a little over 2 cups of cooked chicken. I typically bake chicken and the thought of actually boiling the chicken to cook it actually was intimating to me. I put the chicken breast in a skillet and poured chicken stock over them. I think next time I will cover the chicken completely, however for this meal it worked out fine. I brought the stock to a boil and then covered the chicken and cooked for 15 minutes. Once the chicken was cooked through I shredded the chicken and measured out a little over 2 cups of chicken for dinner and put rest of the chicken in a freezer bag. I will pull it out in the future when I make a meal requiring cooked chicken.


Once the chicken is cooked and shredded mix with cream cheese, milk, and ground cumin. I also diced a yellow onion and cooked in a little butter till tender. Once the onion was cooked add about a tablespoon of diced green chili pepper and mix in with the chicken. Of course I also took the opportunity to mix in some shredded cheddar cheese as well.


I realize now I didn't take many pictures this time, so hopefully my words will give enough of a description for this meal. Mix together the remaining chili peppers, cream of chicken soup, sour cream and milk. I should have taken a picture of the ingredients because the picture below is not the greatest!


I know in my local grocery store they have tortilla shells that are labeled for "enchiladas" and on down the line, burrito size, etc. I however decided to use the small shells that are labeled for soft tacos. I like the smaller size and they all fit perfectly in my 9x13 pan. Grease the pan and fill each shell with the chicken mixture and roll, place seam side down in the dish. Pour the sauce over the shells to cover.


Cover the dish with foil and bake at 350 degrees for 35 minutes, or until heated through. Remove the foil, sprinkle with shredded cheddar cheese and bake for additional 5 minutes or until the cheese melts. This made a few extra and I was able to wrap a few in foil and put them in the freezer for a future, "Doug is home alone for a few days cause I am with the kids in my hometown" nights.


Chicken Enchiladas

adapted from "Better Homes and Gardens New Cookbook"


Medium Yellow onion, diced
1 TBLS. Green Chili peppers (4 oz can of diced peppers, remaining peppers added later)
Melt butter in a skillet and add onions, and cook till tender, add the peppers and turn off heat.
Mix together;
3 oz. cream cheese, softened
1 TBLS. milk
1/4 tsp. ground cumin
1/4 cup shredded cheddar cheese
Stir in chicken and onion/pepper mixture
Set aside and prepare sauce, in a medium bowl mix together;
Reserved chili peppers
1 can cream of chicken soup
1 (8oz) container sour cream
1 cup milk


Preheat oven to 350 degrees.


Spoon about 3-4 TBLS of the chicken mixture onto each tortilla shell. Roll and place seam side down in a greased 9x13 baking dish. Cover with foil and bake for 35 minutes or until heated through. Remove foil and sprinkle about 1 cup shredded cheddar cheese over the shells, bake for additional 5 minutes till the cheese melts.

Linked at Mandy's Recipe Box

Saturday, March 3, 2012

My favorite cookie

I guess that is a bold statement to make and really I don't know if Snickerdoodles are my top cookie choice, but if it isn't number one, it is definitely number 2 in my rankings. These cookies don't last long around here, and I guess in a way that is a good thing, since I would eat all of them if I didn't have anyone around to help out! I am on a bit of a dessert kick lately, but I promise to have a new dinner idea next time!
Begin with butter, shortening, sugar, eggs, flour, cream of tarter, baking soda, and salt. See the Baking powder in there too? Pay absolutely no attention to that sneaky can. I have no idea how the "Clabber Girl" made her way to my ingredient round up. Skip that baking powder in this recipe and try to pretend it isn't even in the picture. Mix all the ingredients, again, no baking powder, in a stand mixer and then allot to chill for about 2 hours. The chilling will help firm the dough to make it easier to roll into balls.
Once the dough is chilled roll into balls. I used my cookie scoop to make uniform sized cookies. Once you have the balls, roll in the cinnamon sugar mixture and place on parchment lined baking sheets, bake for 7-10 minutes at 350 degrees. Keep an eye on the cookies, they should be fluffy, as in the cracks should almost look like there is uncooked dough between them, this is when you take them out, and leave on the cookie sheet for a few minutes, they will flatten back down and be soft and chewy, which in my opinion is perfection!


Snickerdoodle Cookies

1/2 cup butter
1/2 cup shortening
1 1/2 cup sugar
2 eggs
2 3/4 cups flour
2 tsp. cream of tartar
1 tsp. baking soda
1/2 tsp. salt
Combine all ingredients. Chill for at least 2 hours. Preheat oven to 350 degrees. Make sugar cinnamon mixture, approximately 2 TBLS of sugar mixed with 2 Tsp of cinnamon. Roll dough into balls and then roll and coat in cinnamon sugar mixture. Place on parchment lined baking sheets and bake for 7-10 minutes. Remove and let stand on cookie sheet for 1-2 minutes before removing to a wire cooling rack.